« 3D Printer Usage » : différence entre les versions
Aucun résumé des modifications |
Aucun résumé des modifications |
||
| Ligne 3 : | Ligne 3 : | ||
The model of the fabMSTIC printer is Ultimaker 2 Extended+. |
The model of the fabMSTIC printer is Ultimaker 2 Extended+. |
||
= Step by Step = |
|||
= Cura Standard Configuration = |
|||
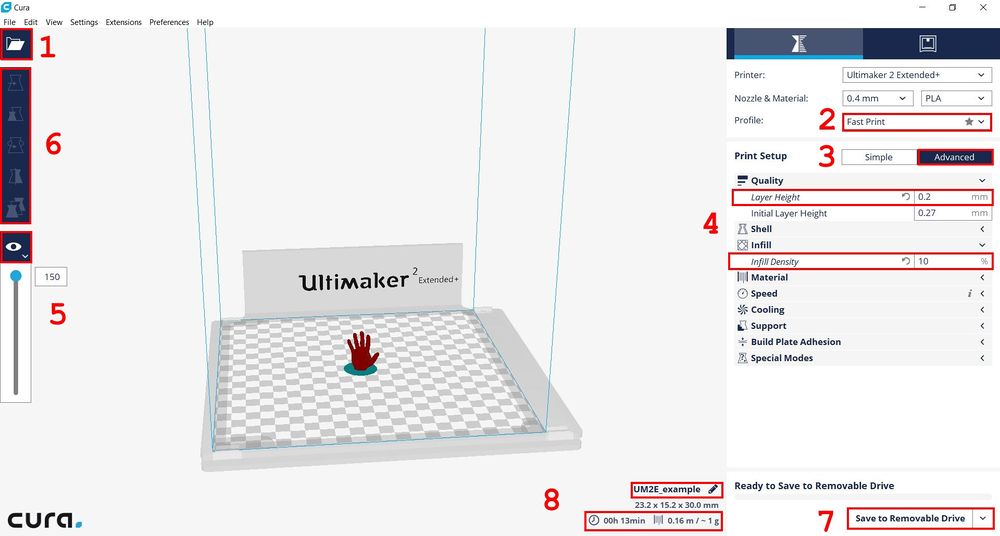
[[File:CuraStandardConfig.jpg|1000px|fabMSTIC Cura Configuration]] |
[[File:CuraStandardConfig.jpg|1000px|fabMSTIC Cura Configuration]] |
||
Dernière version du 28 avril 2017 à 13:12
Installation
In order to use the Ultimaker 3D Printer you have to install the Cura software. The model of the fabMSTIC printer is Ultimaker 2 Extended+.
Step by Step
- Open the 3D Model .STL file
- Choose Fast Print Profile
- Click on the Advanced Print Setup
- Enter 0.2 in Layer Height and 10% in Infill Density
- Click on the eye on the left and choose Layers to check each layer of the model
- Move Resize and Rotate your model if necessary
- Save the gcode file on the SD card
- Check the printing time, if it's exceed 1 hour, tell one of the manager
- Put the SD card in the printer, choose print with the scroll wheel
- Choose your model (UM2E_example)
- Indicate the approximal end of time of the printing on the wood clock (It's 10am the printing time is 13 minute, indicate 10:15 on the clock)
Layer Height
Infill Density
Build Plate Adhesion
From https://ultimaker.com/en/resources/16525-platform-adhesion
When your model doens’t have a completely flat bottom or if you want to improve the bed adhesion you can use one of the platform adhesion types. If you don't select one of the platform adhesion types a "brim" will automatically be printed around the object.
Skirt
The skirt is a line drawn around the print on the first layer. This helps to prime the extruder and it is a good bed levelling check as well. On the skirt you can easily see if it has a good adhesion and good extrusion.
Brim
With a brim some extra lines of plastic are placed around the object on the first layer of the print. These lines are attached to the object, thus creating a bigger bottom surface. This can help preventing warping of your print. It's especially recommended to use a brim when printing very big or very small, thin objects. If you print with plastics such as ABS (which has a high shrinkage), it's also advised to use a brim to decrease the amount of warping.
Raft
A raft adds a thick grid between the model and the build plate. This can especially be useful when you have a model of which the bottom surface is not completely flat or has little adhesion to the build plate. With a raft you make sure that the print will stick better to the build plate.
